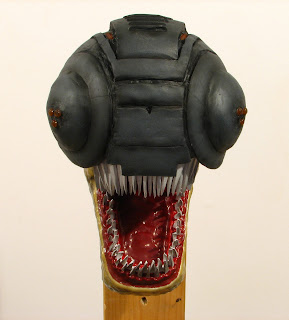
Here's some pictures of the Corpser's head painted.
Thursday, June 30, 2011
Saturday, June 18, 2011
The painting has begun !
Hi folks !
I've broke the ice with the paint job this week. It's nice to see colors on the skull after almost 6 months. It's only primer for the moment, but it's cool to see the contrast between the helmet and the teeth.
I built a quick spray booth in my workplace. There isn't ventilation, but i'm working with acrylic paint (odorless) and i'm doing only small sessions at a time with all windows open.
Airbrushing is a little harder than i thought, but even with no experience, i can see that it does nicer effects than if i was using a paint brush. Experimenting is the key as all other arts and reading the blogs of my friends Ryukaze and Ludo helped a lot understanding many little things.
By the way, it was a hard mind blowing week, because i founded a dust between the lenses of my only camera. The one i was using from the very beginning of this project, and the one that was working so greatly with the stopmotion freeware CMSC (for old Canon camera). After several searches, i found one on classified ads and jumped on it. It only cost me 60$ and it's almost in mint condition. Amazon was offering some used, starting at 125$ + shipping and Ebay, almost only broken ones... :/
The dust between the lenses wasn't removable. I did some tapping on it, but i was afraid to break it and it didn't seem to move. On the picture below, you can see how it look like on pictures (inside the red circle).
Wednesday, June 8, 2011
Here's some flesh !!
Hi there !
Here's some body parts i was working on in the last few weeks.
For the torso, little by little, i added thin layers of dry wall plaster on the wooden block in order to give it a more interesting shape. Each day, i spent like 15 minutes applying the plaster and let that dry-up for a full day before getting back on it. A little sanding here and there and voilà !
For the abdomen and the neck, i prepared two texturized clay plates in order to pour liquid latex on them. Once dry, this will work as flesh.
Here's the plate for the abdomen
I had let the clay dry in deep for a few days, but it was so thin that the edges was become a little curly (it happened on the drying phase). I then applied a thin layer of spray varnish to help removing the latex once poured and dryed-up. It helped, but as mention Richard Svensson, it's harder to apply the latex on a slick surface, because the latex doesn't want to stay in place. I need to say that i was deeply inspired by Richard puppet making tutorial when i planned doing that.
There was 2 tries. The first didn't end very well. I poured too much latex at once and it wasn't completely dry when i removed it one week later. The second one was done, layer by layer, 24hrs between coats.
The bad one it on the left and the good, on the right.
Note: The mold cracked at the center after the first try. I glued it temporary back to do the second try. There wasn't an issue because there's a belt on the Corpser's abdomen that you'll see in the further pictures.
This is the plate for the neck. Note that this one is 1 cm thick. I did some carving strikes to add texture.
It worked almost well. The carving strikes were too deep i think and the latex didn't gives the effect i was expecting. That was a good experience thought. My latex is probably best suited for mold building. It's looks harder and less flexible than the latex others use (like the ones that are made to put on your skin).
Finally, i didn't want to use it this way so i just turn it over. The other side texture was kindda nice too.
I glued both parts together with latex and did some ajustements with scissors, then i put them in place with a stapler. I also cut an old belt of mine to put on it.
There's only some minors adjustements needed and a good paint job before i can move on shooting the last sequences.
Subscribe to:
Comments (Atom)


