Last week, i've done my shopping and this week, many experiments. I've played with silicone, liquid latex, epoxy putty, clay, Super sculpey and with foam padding. Even if i wasn't progressing on my project while doing these experiments, i've gain more confidence and experience with these products which will help me later.
I've start with the legs. First, i've put epoxy putty on a twisted wire.
I've cutted some cushioning soft foam and glued it with contact cement. This material allows to add volume on the body part without adding much weight to it.
I've then applied some thin layers (4) of this very cool product. I don't think it's the same as "real" liquid latex because it looks thicker. But the results are almost the same. The latex is very flexible and can endure a good level of stress before tearing apart.
I wasn't very satisfied with the results, so i made another test with it. I took a broom stick. Put some petroleum jelly on it and applied some layers (5) on it. The last two layers were very thick. I am really happy with the results. It looks more like monster skin.
However, it isn't very easy to fit it on a padded leg. I should make the legs with the first method, but i'll do thicker layers at the end like in the second one.
Richard Svensson posted really good tutorials about building puppets and you should definitely see them if you build one.
Richard Svensson posted really good tutorials about building puppets and you should definitely see them if you build one.
I also played a bit with Super sculpey and i really enjoyed working with it. I did what i will do for the head with a smaller styrofoam ball. I just covered it with Super sculpey and putted it in a small oven. I read that it isn't good to cook food in an oven after you baked Super scultpey, so i found an old one just for that. I've baked it at 225 F for 3 hours.
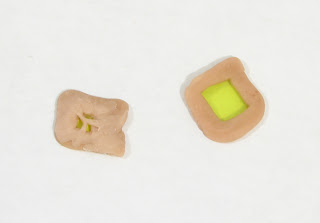
The eyes of the puppet are yellow lights. A LED lights test was required. I found some yellowish plastic that i've use for my test. I putted it in the oven with some Super sculpey to see if it will resist to the heat.
After fitting the LED light in the ball, i noticed that the Super sculpey is translucent.
I applied some black tape in a straw shape to resolve the problem.
That doesn't really worked like that, because the eyes of the puppet are almost sideways ,so we won't see them properly if i do them like that.
I'll try to find some LITE-BRITE yellow pins this week and that should be just perfect when i'll put them a little outside of the head.
While my experiments were drying, i've worked on the body's armature of the puppet. I have builded it very roughtly, but i was very glad it worked the way i expected. I've put two hinges in order that the puppet can lean back and forth, on two joints separating the three body parts: pelvis, abdomen and torso.
I just have to screw or unscrew the two nuts, you see below, to move both rods.
On the final shot, the "Corpser" leans a little backward while pulling his front claws in the air and leans forward on a quick deadly blow on the character. It was very important for me to separate these parts to recreate this movement, naturally as possible.
Here's a first quick test of the body's armature test.
On next week, i want to add the legs wires to the armature with the epoxy putty and to start sculpting the head and add the LEDs lights inside of it.


Man! that is starting to look very good, you defenetly have done some homework. I like the movement very mutch, smooth! Maybe you can spray the inside of the head with a layer of black paint, so the licht can't come trough. Anyway... Power to you Vincent!
ReplyDeleteThis is going to be awesome!!!!
ReplyDeleteReally impressed with how much work you've gotten done. Each experiment gives you something new. Corpser rigging is immense!
ReplyDeleteGood job Vincent, it looks like its coming together really well!!!
ReplyDeleteJeff
Ludo: Thanks ! Can't paint the inside part because it's sculpt over a styrofoam ball. My "black taped straw" looks like doing the work.
ReplyDeleteBrine & Jeff: Thanks !
Jon: Yeah, i needed to be a little more comfortable with each of these products in order to know what are the best solutions for my needs. I really enjoy working with Super Sculpty. The rigging and armature is huge, but this will be easier to animate and easier to work on little details. Sculpting is started. New progress pics will be added this week-end.